|
Ever bought a bike and found it was missing one or both of the oil cooler
reflectors?
Ever finish a ride with less reflectors than when you started out?
What were those factory types thinking? Gluing parts on a motorcycle?
Doh!
Here is a simple way to secure those reflectors once and for all without
changing the appearance of your bike from stock. If you are lucky enough to
still have a reflector on the oil cooler simply pull it off - they are glued
on and, by now, the glue is long past it's effective stickiness date.
 1
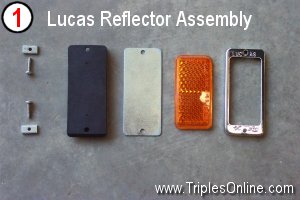
The cast of characters (from the left): 1
The cast of characters (from the left):
a) Screws (21-1940) and captive nuts (82-9573)
- same part numbers for all models
b) Rubber pad (82-9571 or 83-9907 or 82-9907) -
various part numbers, all interchangeable
c) Metal backing plate (82-9906) - used on all
models but not shown for T150 and T160
d) Plastic reflector (19-1338, 99-1119 or 60-1990)
- various part numbers, all interchangeable
e) Chrome trim - included with reflector
You'll also need some wire, I used 0.032" stainless steel, and
some glue, I used contact adhesive.
Clean all the parts. The best way to remove the old adhesive from the
rubber pads is to use a cleaner such as Goof Off, apply with a
toothbrush, then
scrape it off with a straight blade or a gasket scraper.
 |
2
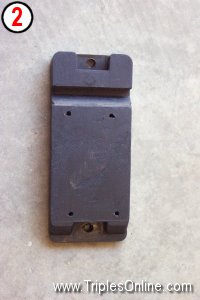
Use a 1/8" (3mm) dia. bit to drill four holes in the rubber pad. Center the
holes on the top and bottom two holes found on the end of the oil cooler.
|
| |
 |
| 3
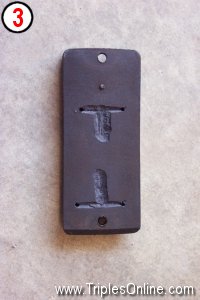
On the outer face of the rubber pad use a sharp modeling knife to
channel out a small groove (for the retaining wire to lie in) across from the
holes on the left to the holes on the right. Channel out a 1/2" (10mm) long
'tail' from the mid-point of each channel towards the center of the pad - see
photo. IMPORTANT: make sure you cut the channels on
the outer face!
|
 |
|
| 4
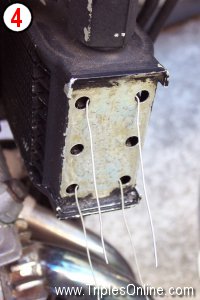
Cut two 6" (150mm) lengths of stainless steel wire.
Feed one wire through the top two holes on the oil cooler and the other
wire through the bottom two holes.
|
| 5 For extra security you can apply adhesive to the back of
the rubber pad. |
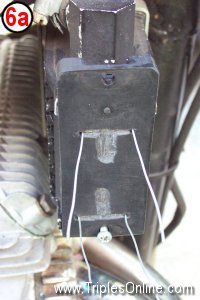
| 6
Slip the rubber pad over the wires. IMPORTANT:
make sure you insert the bottom nut under the rubber pad as you won't be
able to put it in later. An easy way to keep the nut in place temporarily is to
fit it with it's screw - which you can remove later, before fitting the
reflector.
|
 |
 |
|
| Make sure the pad is seated firmly and in
the correct position against
the oil cooler. Twist the ends of each wire together - manually or using a
safety-wire tool - to create a 'tail'. Trim the tails and lay each one down flat
into it's respective channel.
|
| |
 |
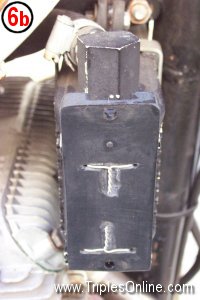
| 7
Finish up by covering the wires with a piece of electrical tape - this
will help prevent them from rubbing on the metal backing plate.
|
 |
|
|
8 Now remove the bottom screw (if you used it to keep the bottom nut in
place when attaching the rubber pad) and re-attach the metal backing plate, reflector and
chrome trim.
Voila!
|
|
|
|
Comments or Suggestions? 
© All Content Copyright 1997-2026 Triples Online. All rights reserved.
|